Over the years, I’ve drawn inspiration from many sources, but it had been a long time since I had been inspired to cook from watching television. Then I happened upon a rerun of Top Chef Masters. Watching Chris Cosentino present puffed beef tendon to the judges was like a call to action.
Growing up as a hyphenated American I ate lots of delicious animals and animal parts that are not featured prominently on the average American dinner table: pickled eel, tongue, lungs, pig skin, conch, etc I have a great love for these foods that anchor me to my background. I find them deeply delicious, and as an extension I have also come to embrace lots of off-cuts, and offal that I didn’t necessarily grow up eating. Tendon is one of those foods. I had never cooked it before, but I eat it fairly regularly. I love Pho with tendon and Cantonese style tendon with soy, vinegar and chili oil is the best.
So, What is tendon? It’s a tough band of fibrous tissue that connects bone with muscle. And it’s delicious.
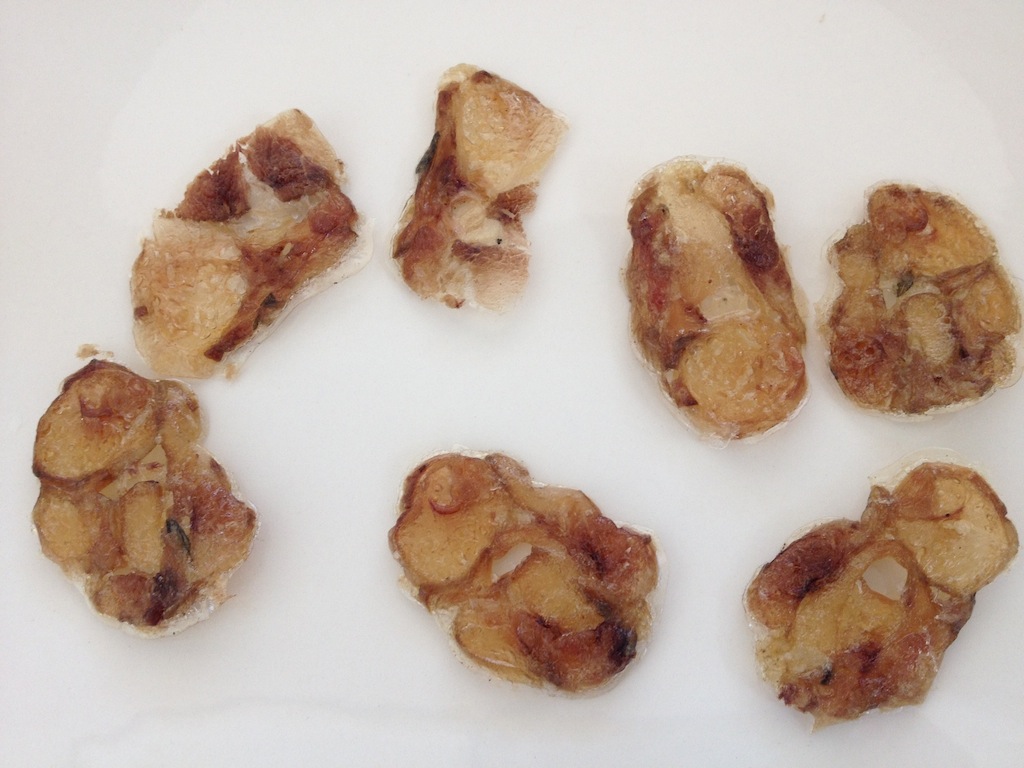
This is what beef tendon looks like:
 Not so pretty. But repeat after me- “it’s delicious!”
Part of what called to me about this recipe is its transformative nature. You take something that is heavy and gelatinous and make it airy and light and crunchy. It’s magic! The easy part about the recipe is the ingredient list-it’s only two long. The hard part is everything else. It’s really food nerdy and time consuming. Having tested this recipe twice now, I will warn you it’s more about the journey than the destination…
PUFFED BEEF TENDON
Yield: about 50 puffs
Special Equipment: Pressure Cooker (optional), Mandolin, Silpat (optional), thermometer
Ingredients:
1 lb beef tendon (about three pieces)
Vegetable oil, for frying
Technique:
1. Cook the tendon– you have options here: If you have a pressure cooker, fill it ⅓ full with water, put in the tendon and cook for about an hour. Follow the manufacturer’s instructions about how best to cool down the cooker to release the pressure. When in doubt, I always use the slow release method, which simply involves waiting for the cooker to naturally cool down (as opposed to the fast method, which involves running the cooker under cold water to hasten things along).
No pressure cooker? No problem. You can always fill a pot ¾ of the way with water put in the tendon, bring to boil, then lower to a simmer for about 4 hours, covered. The size of the pot isn’t important, it just has to be large enough to accommodate the tendon. Peek inside every so often to make sure there is a good amount of liquid left. If the water level is getting low, simply add more.
2.Freeze the tendon– Once cooked, remove the tendon from the cooking water, shake off any excess moisture, pat dry and wrap each piece separately in plastic wrap. Place in freezer for about 2 hours.
3.Slice the tendon– If you don’t already have a mandoline, I recommend the Benriner, it’s inexpensive, and easy to adjust. Don’t know how to use a mandolin? Here is a simple tutorial.
I am going to tell it to you straight: This part of the process is a bit tricky and definitely tedious. The idea is to get thin cross-section of tendon. The thinner the slices, the more quickly and evenly they will dry out. Because the tendon is frozen, it is a bit unwieldy to deal with. You may have to tinker around with the thickness setting on your mandolin.Remember: the thinner the better.
Slice the tendon. Go slowly. Exert even pressure. Be patient.
As you slice the tendon, transfer the slices to a baking sheet lined with a Silpat If you don’t have a Silpat, you can use parchment paper. You can put the tendon slices close together, just make sure they don’t overlap.
4.Dry out the tendon– the more evenly the tendon dries the more successfully it will puff when fried. There are a number of variables here that will ultimately determine how long this part of the process takes: temperature, airflow and thickness of tendon slices chief among them. You want to set your oven to its lowest temperature setting. On my oven it’s 170 degrees. If you have a convection option on your oven, use it- it will speed things up. Cook the tendon until completely dry, rotating the tray every so often. If you are in doubt about how dry the tendon is, touch it. It should not be sticky or tacky. I do not have a convection option on my oven and it took me about 3 hours to dry the tendon through. Here is what it looked like when it was completely dried:
5.Puffing the Tendon- Fill a small pot ½ full of vegetable oil (I used peanut), heat oil to 375 degrees and fry in small batches, about 5 or 6 pieces at a time. The tendon will sink to the bottom of the pot initially then start to expand and pop to the surface. It should look like this: 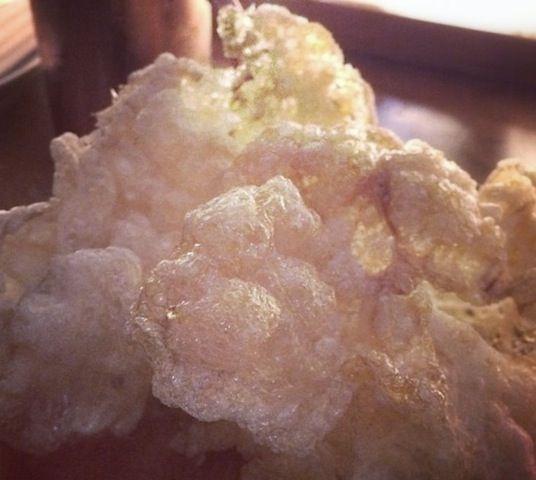 Congratulations! You have arrived.
The Taste- these are pleasantly crunchy with a really delicate lingering beefiness. A little salt sprinkled on fresh from the fryer would have improved the taste situation. More aggressive spicing will overwhelm the beef flavor. If you set out a bowl of these without explaining the transformation that they underwent , or how much effort went into them, people are going to eat them, but they aren’t going to blow anyone’s mind.
The Process- I think this recipe is more about honing kitchen skills and lovingly embracing the idea of something labor intensive than creating a dish so deeply delicious that it will blow people away. This is really tedious and time consuming. It might involve a fair amount of cursing and possibly some boob sweat (where applicable). As if often the case, half way through this recipe I was really questioning why in the world I had chosen this undertaking.
The Verdict– Is it worth it? That really depends on you. Do you think it’s fun to spend an entire day (at least) working on a recipe that yields very little? Are you doing this for your own self edification? In the end, I came full circle and was really very pleased and very proud that I stayed the course and kept going and was able to accomplish exactly what I set out to do.

This looks so similarly to the fried up pork chips that they sell at my local hispanic restaurant! Not sure if they throw in a couple of tendons (if it takes this long to cook!) but I think the look/texture of it looks almost exactly the same!
Yes! You are exactly right- the puffed beef tendons look just like chicharrones de puerco, aka fried pig skin. The taste isn’t that far off either- slightly porky vs. slightly beefy. I must say- chicharrones are WAY easier to make.
Where did you bought this tendon?
Chinatown!
Great article and really great writting! You should definitely explain the process if serving this to people! There good, but there better if people understand the blood sweat and tears of it all!